Saturday 31 December 2011

Happy New Year

Good bye 2011
Welcome 2012!

Friday 30 December 2011

Sewing flannel

Hands up who has never sewn flannel before?
I have always admired flannel, felt that soft, warm cotton and
dreamed of making myself a flannel quilt.
A little while (ahem.. two years) ago, I bought a flannel 'confetti' quilt kit at the Festival of Quilts, on the Seattle Quilt Company stand.
The kit has been sitting in my cupboard ever since, looked at, admired and put away again.
I had two problems:
1. I had never sewn flannel before and didn't want to make a mess of it!
2. I never had the time.
Ok, number two is a lame excuse,
so I have taken advantage of this holiday time to make a start on the quilt.
I have searched the internet for tips on sewing flannel,
some of these are very useful and then others are very contradictory.
HELP!
So far I have found that my fabric does not fray very much and I have opted to use a conventional 1/4" seam allowance (This is totally going against the majority of the advice out there that says to use a bigger seam allowance)
And starch? do I really need starch?
Well, not so far anyway!
anybody got any tips for me?

Thursday 29 December 2011

Holiday reading

Just before the Christmas holidays, I popped into my local library
and borrowed some books..
I was delighted to find a copy of the Liberty Book of Home Sewing -
I am only the second person to borrow it!
It has some beautiful projects for practical items,
I have fallen for a lovely rose inspired cushion which I will just have to have a go at making.
I have always wanted to learn to crochet, so I borrowed a couple of crochet books aswell!
After a quick flick through the books,
I think the 'Super Cute' one will have to wait until I have grasped the basics first!

On Christmas Eve the post man brought a lovely package of fabric - all the way from the USA!
I had won one of Laurie Wisbrun's 12 days of goodies giveaway, 8 fat quarters of her new fabric line 'Modern Whimsy' - its absolutely gorgeous and 100% organic! Those colours, along with the sheep and the rabbits are just screaming SPRING at me!
Anyone know any good crochet themed blogs?
Beginners standard of course!

Wednesday 21 December 2011

Christmas baking

I've been busy baking mince pies..some for giving away..some for keeping..

As you can see I'm a messy cook :)


But they do taste really good!


What are you cooking up for the holidays?

Tuesday 20 December 2011

Snowman Coffee Cosy

Blogger is playing up on me today, so I just hope this turns out OK!
Here is my last minute Christmas sewing project.
A Snowman coffee pot cosy.

I made it using the Go! Holiday Accessories die, and using felt meant that there were no edges to worry about.

Here are the instructions:
First of all measure around your coffee pot and measure the height aswell.
Mine measured approximately 14" x 6 1/2", so I cut out a two pieces of black fabric 14 1/2" x 7" to include seam allowances, one for the background and one for the backing.
I used my Accuquilt Go! Baby to cut out the snow men and accessories. The felt cuts perfectly and those snowballs were a dream to make!
Use embroidery thread and a running stitch to stitch the snowmen in place. I had some sparkly embroidery thread in my stash which worked out really well against the felt! (Although it doesn't show up so well in the photos!)

Next place the backing fabric on top of the snowmen, right sides together.
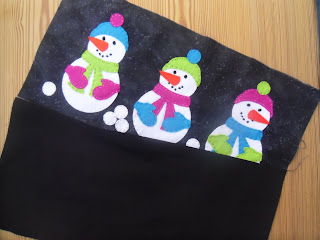
Sew around the outside using a 1/4" seam, leave a 6" gap in the bottom and trim the corners

Turn it inside out and place a piece of insulated wadding inside the cosy.
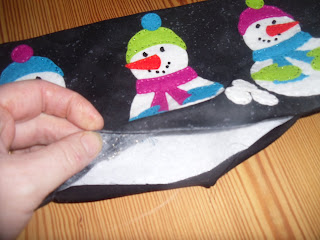
Pin the seam in place and hand sew up the gap in the cosy. Quilt around the outside of the snowmen, just to keep the wadding in place.

Cut out two strips of felt 1 1/4" x 4".
On both strips, make a button hole at one of the ends.
Sew the strips in place using buttons. Sew on two buttons on the opposite sides.
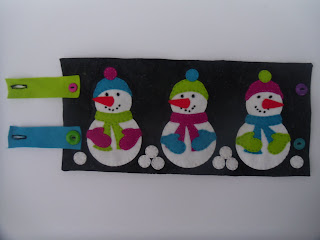

There you have it a speedy Snowman Coffee Cosy!

Just in time for Christmas..

Monday 12 December 2011

I won too!

I have always loved entering giveaways and competitions.
I enter them regularly.
I don't often win, but I get to read some amazing blogs.
Recently I ordered some Anna Marie Horner Loulouthi fabric from River Fabrics,
a fabulous online fabric store.
I have been admiring this fabric for a long time and now have the
perfect excuse to use it in a new project!
Then about a week later I got a lovely surprise when I won a giveaway sponsored by River Fabrics on the needles and lemons blog.
Five yards of Kona solids and a spool of aurifil thread- oh lucky me!
It's like getting a lovely present - doesn't it make you feel good?

Sunday 11 December 2011

Giveaway winner!

Well, first of all a big big big thank-you,
to everyone who entered the Accuquilt Go! baby giveaway!
Without any further ado, I know you all just want to find out..
according to Mr Random number Generator, the winner is....
Sewconsult who said "I like Accuquilt FB page."
CONGRATULATIONS!
Please email me your details and your choice of dies.

Wednesday 30 November 2011

GO BABY GIVEAWAY!!

THIS GIVEAWAY IS NOW CLOSED
Is this on your Christmas wishlist?
Well here's your chance to win a Go! baby fabric cutter and 3 dies of your choice.
Take my word for it, it'll be difficult to pick just 3 :)
I deliberated long and hard before I picked my dies,
but am so happy with them.
Next one on my wish list has to be the Sarah Vedeler Go! Star Points.
I used the circles die and the rick rack die to make my 'Flying High' quilt.
Another bonus from Accuquilt is this free set of patterns and blocks, which you
receive when you sign up to receive their newsletter by email.
THIS GIVEAWAY IS NOW CLOSED
To enter the giveaway:
1. Go to Accuquilt.com and tell me which 3 dies you would pick if you won!
2.'Like' Accuquilt on facebook, (*you do not need to leave a comment
on their facebook page) -come back here and tell me!
3. 'Like' Lisnaweary Quilts on facebook and come back and tell me.
4. Become a follower of this blog or tell me if you already are.
5. Blog or facebook about this giveaway, and come back and tell me.
Giveaway closes 11th December 2011 at midnight GMT.
Best of luck everyone!

This is a sponsored giveaway

Wednesday 23 November 2011

'Flying High' - tutorial

After playing about with the Accuquilt Go! baby this is what I've made.
'Flying High' - finished size 44" x 55".
I've never been in a hot air balloon, and I'm really not great with heights!
After making this mug rug, I wanted to make something else using a hot air balloon theme.
The Go! Circle die was super quick and the Rick Rack die made it very easy to cut the border.

Here's the tutorial:
1. Cut out white background fabric 28" x 39".
2. Pick various fabric scraps to cut out balloons. I had some fabrics left over from another project, some of it was cut into narrow strips. I was able to use these to make some of the balloons.
I stitched strips together ( they need to be at least 6 1/2" long - this is the width of the die), pressed the seams open and pressed a piece of bondaweb on the back.
3. Place the piece of fabric on top of the circle die, and place a cutting mat on top.
4. Roll the die through the cutter. (my 9 year old daughter loved doing this!)
5. Voila - perfect circles - or balloons! Cut out 6 small, 6 medium and 6 large circles using various colours of fabrics.
6. For the baskets, cut out 6 1" squares, 6 1 1/2" squares and 6 2 1/2" squares.
7. Place the balloons and baskets on the background fabric. Place the smallest ones at the top, medium ones in the middle and larger ones at the bottom. Press in place.
8. Using a water soluble marker and a ruler draw on the ropes between the basket and the balloon.
9. Using black thread sew around the balloons, down the ropes and around the basket.
I sewed several lines on the ropes to make them look a little thicker.
10. To make border, cut out 6 8 1/2" x width of fabric strips. Attach borders making sure to mitre corners.
11. To make the rick rack border, sew strips of fabric together as in step 2. This time you need to make a long piece of sewn strips. Two pieces measuring 54" x 6 1/2" and two pieces measuring 65" x 6 1/2".
12. Press the seams open.
12. Press bondaweb on the back of the strips.
13. Using a permanent pen, mark the edges of the die on the foam - this just makes it easier to see the end when you're placing the fabric on top. (The Rick Rack die is open ended, which allows you to fold long strips of fabric and the die will cut in a continuous piece.)
14.Place the strip of fabric on the die, folding over the fabric where the die is marked.
15. Place the cutting mat on top and roll through the baby!
16. Perfect rick rack!
17. Place the rick rack border on the quilt top with ends overlapping, matching the edge of the rick rack with the edge of the quilt top.
18. Using a ruler and water soluble pen, draw a line on the rick rack in line with the mitred corner and where the rick rack overlaps.
19. Fold back the top rick rack and repeat on the other rick rack.
20. Cut along each of the drawn lines one at a time.
21. These should meet perfectly. Pin the rick rack in place and repeat for all four corners.
22. Press the rick rack in place.
23. Start at the mitred corners and applique the rick rack in place.
24. Applique both sides of the rick rack in place.
25. Layer backing, wadding and quilt top - quilt as desired. I free machine quilted some loopy circles. I used Wonderfil Silco white thread for the background and black thread for the border.
26. Buy or make 1 1/2" single fold continuous bias binding. (There's a great tutorial here)
It really is necessary to use bias binding to get around all those curves.
Sew on the binding.
27. Trim back the excess fabric and wadding following the edge of the rick rack.
28. Carefully snip the curves.
29. Carefully fold the binding over, pin and sew in place.
There you have it - Flying High made with the help of the Accuquilt Go! baby!
Here's the back I pieced together:
I just have to make my quilt label now for the back and it will be complete.
As always I'd love to see your photos if you make 'Flying High', flickr group is here.